【Three.js】透明背景/背景改色/環景貼圖

也許你已看過這篇three.js的基礎介紹,也應該了解three.js的匯入架構。如果很麻煩,你可以複製下列程式碼到編輯器中修改。

<!DOCTYPE html>
<html lang="zh-TW">
  <head>
    <meta charset="UTF-8" />
    <meta name="viewport" content="width=device-width, initial-scale=1.0" />
    <title>基礎版型</title>
    <style>
      * {
        padding: 0;
        margin: 0;
        box-sizing: border-box;
      }
      body {
        width: 100%;
        height: 100dvh;
      }
    </style>
  </head>

  <body>
    <script type="importmap">
      {
        "imports": {
          "three": "https://cdn.jsdelivr.net/npm/three@v0.164.1/build/three.module.js",
          "three/addons/": "https://cdn.jsdelivr.net/npm/three@v0.164.1/examples/jsm/"
        }
      }
    </script>
    <script type="module">
      import * as THREE from "three";
      import { OrbitControls } from "three/addons/controls/OrbitControls.js";

      const scene = new THREE.Scene();
      const camera = new THREE.PerspectiveCamera(
        75,
        window.innerWidth / window.innerHeight,
        0.1,
        1000
      );
      camera.position.z = 30;
      const renderer = new THREE.WebGLRenderer({ antialias: true });
      renderer.setSize(window.innerWidth, window.innerHeight);
      document.body.appendChild(renderer.domElement);

      const geometry = new THREE.TorusKnotGeometry(5, 2, 100, 100);
      const material = new THREE.MeshStandardMaterial({
        color: "#ffffff",
        metalness: 0.5,
      });

      const torusKnot = new THREE.Mesh(geometry, material);
      scene.add(torusKnot);

      const pointLight = new THREE.PointLight("white", 300);
      pointLight.position.set(5, 5, 10);
      scene.add(pointLight);

      const controls = new OrbitControls(camera, renderer.domElement);
      controls.enablePan = false;
      controls.enableZoom = false;
      function animate() {
        requestAnimationFrame(animate);
        torusKnot.rotation.y += 0.01;
        controls.update();
        renderer.render(scene, camera);
      }

      animate();

      window.addEventListener("resize", function onWindowResize() {
        camera.aspect = window.innerWidth / window.innerHeight;
        camera.updateProjectionMatrix();
        renderer.setSize(window.innerWidth, window.innerHeight);
      });
    </script>
  </body>
</html>

1. 透明背景

想改掉預設的黑色背景,就在 new THREE.WebGLRenderer() 中加入 alpha:true 屬性,場景背景就會變透明,顯現父層元件的背景色。

const renderer = new THREE.WebGLRenderer({ antialias: true, alpha:true });

2. 背景改色

方法1. 更改場景background屬性

在宣告scene後,對background屬性進行修改。

const scene = new THREE.Scene();
scene.background = new THREE.Color(0x87CEEB);

方法2. 更改渲染器設置

在宣告renderer後,使用setClearColor設置顏色。

const renderer = new THREE.WebGLRenderer({antialias: true});
renderer.setClearColor(0x87CEEB);  

3. 漸層背景

3-1. 透明背景 + 父層漸層

想製作漸層背景,可以使用第一點提到的『透明背景』。
new THREE.WebGLRenderer() 中加入 alpha:true 屬性後,更改父層元件的背景CSS。

如果把渲染範圍指定在<body>元件,就更改body背景為漸層色:

<style>
 *{
   margin: 0;
   padding: 0;
   box-sizing: border-box;
 }
 body{
   /* 漸層背景 */ 
   background: linear-gradient(to right, #c3efb2, #5dd2d5);
 }
</style>

3-2. 製做漸層畫布,當成場景背景的材質

const canvas = document.createElement('canvas');
const context = canvas.getContext('2d');

canvas.width = 1;
canvas.height = 256;

const gradient = context.createLinearGradient(0, 0, 0, 256);

gradient.addColorStop(0, '#87CEEB'); // 天藍
gradient.addColorStop(1, '#FFC0CB'); // 淺粉

// 將漸層設為填充樣式
context.fillStyle = gradient;
context.fillRect(0, 0, 1, 256);

// 將canvas轉換為Three.js材質的對象
const texture = new THREE.CanvasTexture(canvas);
texture.minFilter = THREE.LinearFilter;
scene.background = texture;

4. 環景貼圖(HDR)

4-1. 取得hdri檔案

你可以到poly hevenHDRi Haven,下載免費hdri檔案,但可能有2k解析度的限制。也可以用blender或photoshop自己做(有機會再獨立寫一篇關於HDRI的)。

4-2. 匯入RGBELoader模組

環景貼圖必須使用 RGBELoader 這個外掛模組,把他匯入。

<script type="module">
 import * as THREE from "three"; 
 import { RGBELoader } from "three/addons/loaders/RGBELoader.js";

 //將場景、相機、渲染、物件、動畫等其餘程式碼添加於此...
 //...
</script>

4-3. 建立環景貼圖

使用 JavaScript 的URL構造函數生成HDR圖片的路徑,並使用 RGBELoaderload方法載入此路徑,完成後執行由貼圖紋理(texture)作為參數的回調函數。

const hdrTextureURL= new URL('/src/assets/colorful.hdr', import.meta.url);
const loader = new RGBELoader();
loader.load(hdrTextureURL, function (texture) {
    //指定紋理的映射類型
    texture.mapping = THREE.EquirectangularReflectionMapping;

    //用環景貼圖取代背景
    scene.background = texture; 

   //用環景貼圖的光線來照亮場景
    scene.environment = texture;

    //受到環景貼圖影響的物件移到callback funtion裡面,例如方塊或扭結...等
    //...
})
把物件移進回調函數時,記得改成在外部先定義物件名稱,否則animate()函數可能會找不到物件,就無法執行旋轉動作。

【Three.js】從0開始你的網頁3D生活

Three.js是在網頁上渲染3D場景及物件的知名模組之一,已有許多使用者用Three.js做出各種網頁3D效果(請參考Example),讓我們來看看如何應用它。

1. 安裝

官方文件提供了兩種安裝方式

選項1. npm安裝

# 安裝three
npm install --save three

# 安裝vite
npm install --save-dev vite

#運作vite
npx vite

選項2. CDN連結

本篇介紹以CDN連結方式為主,記得把<version>替換為版本號碼,例如v0.164.1
雖然官方安裝教學寫著CDN連結要加在<head></head>標籤之間,<style>元件之後,但本人實測沒有卵用,加在<body>標籤結束之前,運作上沒問題。

<script type="importmap">
  {
    "imports": {
      "three": "https://cdn.jsdelivr.net/npm/three@<version>/build/three.module.js",
      "three/addons/": "https://cdn.jsdelivr.net/npm/three@<version>/examples/jsm/"
    }
  }
</script>

根據three.js版本不同,匯入外掛的路徑有可能不同,目前外掛放在/addons目錄,以下是匯入範例:
import { OrbitControls } from 'three/addons/controls/OrbitControls.js';

2. 初始化

匯入three核心組件

<script type="module">
 import * as THREE from 'three';
 
 //將場景、相機、渲染、物件、動畫等其餘程式碼添加於此...
 //...
</script>

創建第一個場景及相機,並設定渲染範圍。
先將範圍渲染在整個<body>上,並占滿視窗的寬(window.innerWidth)高(window.innerHeight)。

antialias: true 是反鋸齒的意思,使圖形邊緣變得更加平滑。

//創建場景
 const scene = new THREE.Scene();

//創建相機
 const camera = new THREE.PerspectiveCamera( 75, window.innerWidth /  window.innerHeight, 0.1, 1000 );
//相機位置設定
 camera.position.z = 5;

//設定渲染範圍的尺寸
 const renderer = new THREE.WebGLRenderer({antialias: true});
 renderer.setSize( window.innerWidth, window.innerHeight );

//指定渲染位置
 document.body.appendChild( renderer.domElement); 
在網頁3D座標中,Z軸是垂直於螢幕的:相機的Z軸位置設為5,意味著相機(使用者)離座標中心點有一定的距離,數字越大,使用者離中心點越遠;數字越小,使用者離中心點越近。與3D軟體y、z軸向相反,3D軟體的z軸一般代表高度。

3. 加入物件

定義形狀及材質,作為參數填入新物件(cube)後,加入場景中,目前套用基本的立方體構造(BoxGeometry),以及帶有金屬光澤的標準材質(MeshStandardMaterial)。

//定義形狀(geometry)
 const geometry = new THREE.BoxGeometry( 1, 1, 1 );

//定義材質(material)
 const material = new THREE.MeshStandardMaterial({ 
  roughness: 0,
  metalness: 1,
  color:0xffffff,
});

//創建物件
 const cube = new THREE.Mesh( geometry, material );
 scene.add( cube );

4. 光源

AmbientLight 指的是環境光,均勻照射所有物件,沒有方向性故不能投射陰影。

 // 添加環境光
const ambientLight = new THREE.AmbientLight(0x404040); 
scene.add(ambientLight);

DirectionalLight 指的是平行光,看起來像無限遠,適合模擬太陽光。

const directionalLight = new THREE.DirectionalLight("yellow", 1);
directionalLight.position.set(5, 5, 5);
// 讓光源能夠投射陰影
directionalLight.castShadow = true; 
scene.add(directionalLight);

// 調整光源陰影的解析度
directionalLight.shadow.mapSize.width = 1024;
directionalLight.shadow.mapSize.height = 1024;

還有其他類型的光源,例如半球光(HemisphereLight)、點光源(PointLight)、面光源(RectAreaLight)、聚光燈(SpotLight),詳細需要獨立開篇來講。

5.動畫

最後,設定動畫函數,使動畫運作。

//動畫函數
 function animate() {
	requestAnimationFrame( animate );	
	cube.rotation.y += 0.01;
	renderer.render( scene, camera );
 }
 animate();

6. 互動(OrbitControls)

想像玩遊戲一樣讓訪客與畫面互動,轉動相機視角,你可以使用OrbitControls。
首先,匯入OrbitControls模組。

<script type="module">
  import * as THREE from 'three';
  import { OrbitControls } from 'three/addons/controls/OrbitControls.js';
</script>

OrbitControls屬性設置

關於OrbitControls的屬性說明請看官方介紹

  • enableDamping:漸變阻尼效果,使相機移動更平滑。
  • dampingFactor:阻尼系數,控制阻尼效果的強度。
  • screenSpacePanning:設為false使相機只能繞目標旋轉。
  • enablePan:設為false禁止相機左右移動。
  • enableZoom:設為false禁止鏡頭縮放。
  • minDistance / maxDistance:設置相機的最小和最大縮放距離。
  • maxPolarAngle:設置相機的最大垂直旋轉角度,以防止相機移動到地面以下。
  • autoRotate:設為true自動旋轉。
  • autoRotateSpeed:自動旋轉速度。
const controls = new OrbitControls(camera, renderer.domElement);
controls.enableDamping = true;
controls.dampingFactor = 0.25;
controls.screenSpacePanning = false;
controls.minDistance = 1;
controls.maxDistance = 5;
controls.maxPolarAngle = Math.PI / 2

在動畫中更新OrbitControls

也就是在animate函數中增加這行controls.update();

function animate() {
   requestAnimationFrame(animate);
   
   cube.rotation.y += 0.01;

   controls.update(); // 更新OrbitControls
   renderer.render(scene, camera);
}

7. 視窗縮放

渲染範圍的寬高只會在載入網頁時初始化一次,之後縮放視窗不會重新載入渲染範圍的寬高。為了使網頁運作得更好,我們需要加入resize監聽事件,確保縮放視窗的同時,渲染範圍也能及時更新。

對視窗加入resize監聽事件,若觸發resize動作,則更新視窗寬高數字。

window.addEventListener("resize", () => {
//更新相機
 camera.aspect = window.innerWidth / window.innerHeight;
 camera.updateProjectionMatrix();
 
//更新渲染範圍
 renderer.setSize(window.innerWidth, window.innerHeight);
});
【swiper教學】露出左右2側的全版輪播牆

有一種常見的輪播牆,佔據的畫面寬度的100%,左右卻又露出前後張幻燈片的一部分,這種輪播牆要怎麼做呢?

只要改CSS就行了!

前置作業-你需要從swiper官網複製的東西

目前以CDN連結為範例,先按照官方文件demo複製基本的輪播牆程式碼進來。

  1. cdn文件連結(基礎的css及js bundle)
  2. html架構
  3. 初始化js
<!-- 1-1. CSS放header -->
<link rel="stylesheet" href="https://cdn.jsdelivr.net/npm/swiper@11/swiper-bundle.min.css" />

<!-- 2. swiper的html架構-->
<div class="swiper mySwiper">
 <div class="swiper-wrapper">
  <div class="swiper-slide">Slide 1</div>
  <div class="swiper-slide">Slide 2</div>
  <div class="swiper-slide">Slide 3</div>
  <div class="swiper-slide">Slide 4</div>
  <div class="swiper-slide">Slide 5</div>
 </div>
 <div class="swiper-pagination"></div>
</div>

<!-- 1-2. jsbundle放在html架構後面,body標籤結束以前 -->
<script src="https://cdn.jsdelivr.net/npm/swiper@11/swiper-bundle.min.js"></script>

<!-- 3. 初始化js放在jsbundle後面,body標籤結束以前 -->
<script>
    var swiper = new Swiper(".mySwiper", {
      slidesPerView: "auto",
      centeredSlides: true,
      spaceBetween: 30,
      pagination: {
        el: ".swiper-pagination",
        clickable: true,
      },
    });
</script>

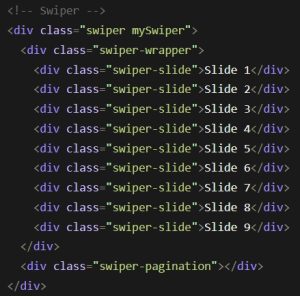
觀察到swiper的HTML架構主要有3層元件

在著手修改前,我們要先理解swiper.js的輪播牆架構。

  1. 最外框
  2. 包裹住所有幻燈片的外框 wrapper
  3. 而單一幻燈片外框 slide


若需要左右箭頭(navigation)及進度條(pagination),就自行加上對應的div元件。

把.swiper-wrapper寬度設整個頁面的70%,並增加overflow:visible的語法,就能看到外側本來被隱藏的幻燈片。

/* 設定幻燈片包裹區塊的CSS */
.swiper-wrapper {
width: 70%;
height: 100%;
overflow:visible;
}

但此步驟衍生的問題是,幻燈片會全部可見,導致畫面寬度被拉寬,並且橫向出現卷軸。
為了解決這個問題,我們必須在最外框.swiper元件加上width:100%;及overflow:hidden;,使最大寬度不超出畫面。

/* 設定最外框CSS超過100%就隱藏 */
.swiper{
position:relative;
height:360px;
width: 100%;
overflow:hidden;
}
.swiper-wrapper {
width: 70%;
height: 100%;
overflow:visible;
}

/* 給一般幻燈片和active的幻燈片一些樣式差異 */
.swiper-slide {
text-align: center;
font-size: 18px;
background: gray;
display: flex;
justify-content: center;
border:1px solid gray;
align-items: center;
opacity:0.5;
transition:0.3s;
color:#fff;
}
.swiper-slide-active{
border:2px solid #fff;
background:orange;
opacity:1;
}

如此一來,露出左右兩側的全版輪播牆,就完成了!

Slide 1
Slide 2
Slide 3
Slide 4
Slide 5
Slide 6
Slide 7
Slide 8
Slide 9
延伸閱讀-看看如何在網頁上實現3D畫面:【Three.js】從0開始你的網頁3D生活

【SMTP】如何用Emil信箱收到網站訪客填表的內容

這篇文章記錄了如何使用Resend服務,及網域主機商提供的Email來接收網站上的訪客填表訊息

什麼是SMTP?

SMTP(Simple Mail Transfer Protocol)是一種用於傳送電子郵件的網路協定,它定義了電子郵件如何在網絡中傳輸並進行交換。SMTP 服務提供了一個標準的方式,讓電子郵件客戶端(如電子郵件應用程式、網站等)能夠發送郵件到郵件伺服器,並由伺服器負責將郵件傳遞到接收者的郵件伺服器。

流程及概念

  1. 註冊Resend
  2. 更改網域的DNS並進行驗證
  3. 新增API
  4. 撰寫程式碼

1. 註冊Resend

首先,前往 Resend 官網進行註冊,並登入管理介面。

點選右上角的 Docs↗ 按鈕,可以選擇不同框架的應用說明文件,或繼續閱讀本篇 Node.js 框架的操作說明。

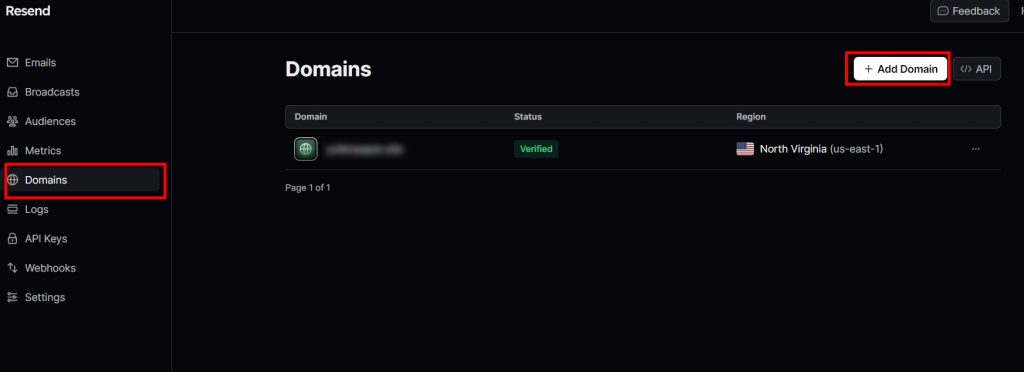
在左側邊欄中點選 Domains,然後按下 + Add Domain 以新增網域。

SMTP-RESEND-新增網域
新增網域時不能填寫 localhost 或免費供使用者部署的域名(例如:github.io、vercel.app)。 必須使用你自己付費註冊的網域,因為寄信時需要使用『實際存在的信箱』,而你購買的網域能提供這個服務。

不知道如何自行創建信箱嗎?
請參考【主機管理】如何在C-panel管理介面新增信箱

填入你購買的網域,並按下新增按鈕。
成功新增後,畫面上會顯示三串文字,分別為一個 MX 記錄和兩個 TXT 記錄。

SMTP-RESEND-記錄三個record並驗證

接著往下看,我們將要把這三個紀錄,新增到DNS當中。

2. 更改網域的DNS並進行驗證

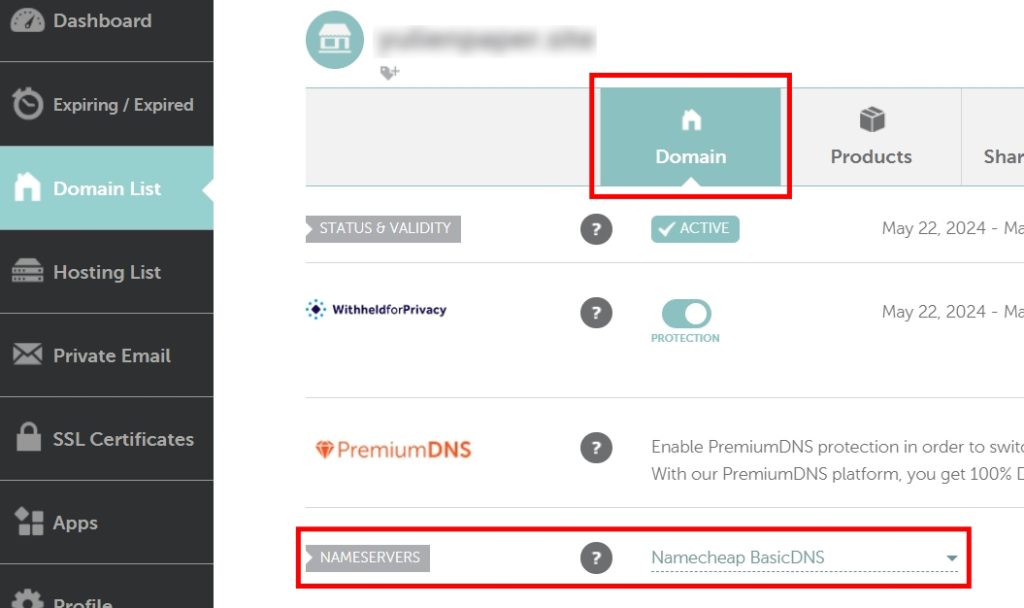
以下以Namecheap的介面為例,若網域管理仍為預設值『Namecheap Web Hosting DNS』,改成『Namecheap BasicDNS』後打勾存檔,進階管理分頁才會出現可填寫Record的欄位。

SMTP-DNS要改成Basic才能自行設定

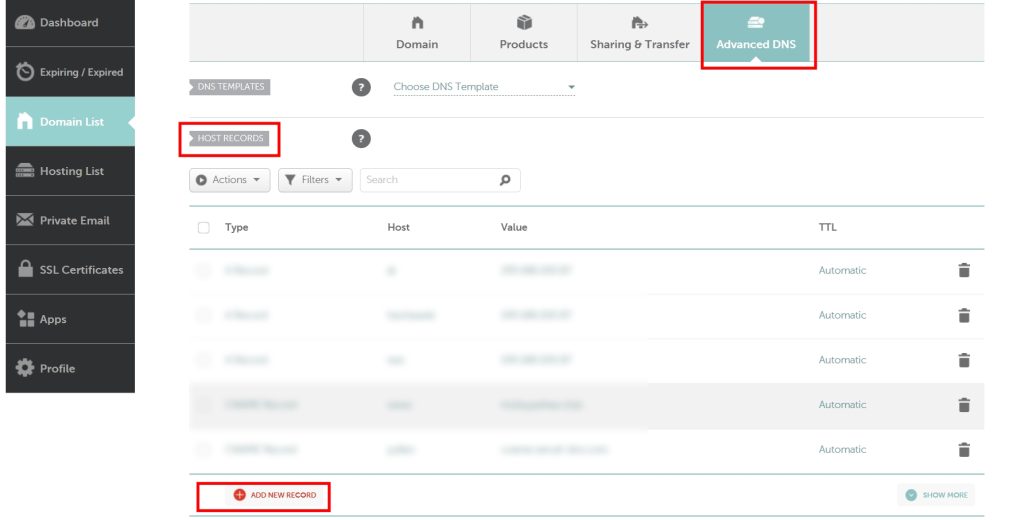
更改完成後,點選上方的Advanced DNS(進階DNS)分頁,會看到HOST RECORDS欄位,新增兩個TXT Record類型並從Record把Value(值)複製貼上。

SMTP-設定DNS紀錄的位置

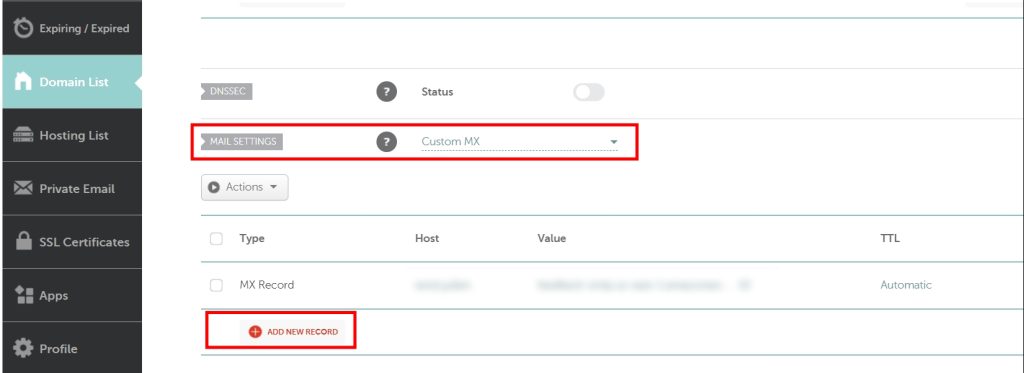
剩下的MX Record填寫位至於下方MAIL SETTINGS欄位,選擇CUSTOM MX,一樣新增並將值複製貼上。

SMTP-MX RECORD位於EMAIL的位置

回到Resend的網域管理畫面並按下驗證按鈕,如果有偵測到3個Record,過一段時間就會轉為綠色,DNS設定就大功告成。

改用Namecheap BasicDNS時,DNS設定有可能是空的,這會導致網頁沒辦法出現,記得新增一個A record類型,Host name為@,值為主機的IP位址,然後新增Cname record類型,Host name為www,值填寫你的購買的網域。

3.新增API

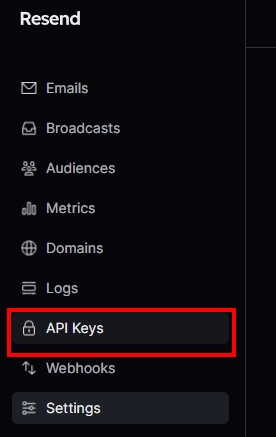
再次回到Resend後台的左側側邊欄,找到API Keys並點選進入管理畫面。

SMTP-RESEND-創建新的API Key
SMTP-RESEND-按下創建按鈕

按下右上角『創建API Key(+Create API key)』按鈕。
只填寫第一欄API名稱,剩下欄位維持預設值,按下新增(Add)。

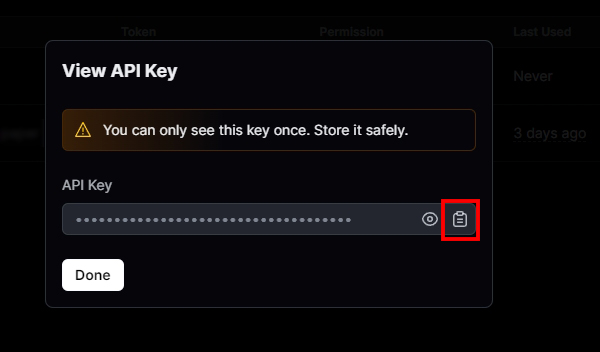
最後,出現寫著API Key的彈窗,立刻按下右邊複製按鈕,把這串API Key儲存下來。

API Key生成後只有一次複製機會,若忘了複製又關掉彈窗,只能刪除舊的再重新建立。
SMTP-RESEND-API Key只會出現一次立刻複製

於環境變數文件(.env)新增一個名為『RESEND_API_KEYS』的變數,並將剛剛複製的API Key貼上,作為『RESEND_API_KEYS』的值。

SMTP-RESEND-把API Key貼到環境變數文件

完成上述步驟後,就可以把API Key的彈窗關掉了。

4.撰寫程式碼

首先,打開專案目錄,並用 npm 安裝 Resend:

npm install resend

安裝完成後,打開路由管理文件,引入 Resend 模組:

const { Resend } = require("resend");
const resend = new Resend(process.env.RESEND_API_KEYS);

預計在 /contact 路徑進行發送新表單時(POST)使用 Resend,程式碼如下:

app.post("/contact", async (req, res) => {
  try {  
  const { data, error } = await resend.emails.send({
    from: "網站名稱 <填寫你註冊的網域的email,例如support@domain.com>",
    to: ["<填寫你希望收到信的信箱,例如youraccount@gmail.com>"],
    subject: "信件主旨",
    html: "信件內容",
  });  
    req.flash("success_msg", "已寄出!");
    console.log({ data });
  } catch (error) {
    req.flash("error_msg", "發生錯誤,無法寄出!");
    console.log({ error });
  }  
});

如果你想在信件中顯示網站訪客的填表訊息,請看以下範例:

app.post("/contact", async (req, res) => {
  try {
  let { name, phone, email, content } = req.body;
  const { data, error } = await resend.emails.send({
    from: "網站名稱 <填寫你註冊的網域的email,例如support@domain.com>",
    to: ["<填寫你希望收到信的信箱,例如youraccount@gmail.com>"],
    subject: `聯絡表單|來自${name}的問題`,
    html: `<h3>稱呼:${name}</h3>
    <h3>聯絡電話:${phone}</h3>
    <h3>聯絡信箱:${email}</h3>    
    <h3>洽詢內容:</h3><p>${content}</p>
    `,
  });  
    req.flash("success_msg", "已寄出!");
    console.log({ data });
  } catch (error) {
    req.flash("error_msg", "發生錯誤,無法寄出!");
    console.log({ error });
  }  
});

req.body 中取得 namephoneemailcontent 欄位的值,並用反引號(模板字符串)及 ${} 代入變數,即可在信件中直接顯示訪客的填表訊息。